Stories posted under Pinkbike Community blogs are not edited, vetted, or approved by the Pinkbike editorial team. These are stories from Pinkbike users.
If a blog post is offensive or violates the Terms of Services, please report the blog to Community moderators.
UPDATED :The photography anthology: Part 1 - HDR (plus a rant)
The technical and practical aspects of HDR photography. Also stop stealing my pictures.
Updated 5th July 2010
Added loads of pictures.
----------------------------------------------------------------------------------------------This will be first in a series of explanatory articles written by me about my photographic techniques. Today it's what I seem to be best known for, my HDR photos. Next time: Panoramas. Then HDR Panoramas. Then timelapses. Then HDR Timelapses.
No1: High dynamic range photography.
If you want to know how to actually do it, skip this part.
**The technical bit**
HDR is used to overcome the fact that a cameras dynamic range (the contrast between the brightest and darkest areas of a scene) is very low compared to the eye. If you look at a landscape you can see a deep blue sky plus white clouds and bright green trees. If you pick up camera and try to capture the scene, one of 3 things will happen:
-The camera will adjust the exposure to the sky, resulting in a fast shutter, and leaving you with the deep blue sky and clouds looking great, but the landscape totally black.
-The camera may expose the ground correctly, using a slower shutter, but this results in the sky being completely white and 'blown out'.
-Most likely, the camera will compromise between these extremes and leave you with a somewhat passable image. Passable until you see the 2 alternatives.
Here's an example, it's from a recent hike up Corstorphine hill:
![photo]()
Here, the exposure is set for the land. The greens are bright and clear, if slightly washed out due to bloom. But look at the sky, it's blown out, far too light and the clouds are pure white.
We now want to get the detail in the clouds and sky. So we underexpose the image:
![photo]()
As far as the sky goes, this is much better. It's a lovely deep blue and you can see all the detail in the clouds. But now the landscape is too dark. It seems we can't win.
The compromise, or normal exposure, is what you'll get if you have your camera on auto mode and use full evaluative metering. This represents the average between the two above extremes:
![photo]()
Now you may think, and I agree, that the normal exposure looks better than either the over or underexposed ones. Compare them more closely though. In the normal one there isn't as much detail in the bright areas as the overexposed one, nor is there as much detail in the dark areas as the underxposed one.
There are two methods to bring out detail in both the bright and dark areas:
The first is to use a gradient neutral density filter, which I won't explain here, but it isn't hard to understand. This technique creates a very natural, smooth image (at least compared to the surrealness of HDR). This does require specific additional equipment which I may soon invest in as I am very fond of landscapes. Enough about this anyway.
The second way is to employ HDR. It's very simple in theory (and oh so head-poundingly complicated in practice, trust me). Remember the landscape example? You can either expose the sky OR the land correctly, but not both in one image. So why not simply take the sky from the deep-blue sky image and the land from the bright-land image and stick them together? It's the same scene so it'll line up perfectly. This is, in essence, what HDR does. If you're feeling crafty you can try my example easily enough. Just take your 2 exposures (one with the sky correctly exposed, the other with the land) and use your local image editing software to manually cut and paste the sky onto the land. It looks odd because you're not getting the dark area detail into the land, but it shows the concept.
The actual way it's done in the specialist HDR software is somewhat different but leads to the same results. It's normal to use 3 exposures to accomodate the midtones of the scene; that is, one shot overexposed, one 'normal' (ie compromised) exposure and one underexposed. The software takes the correctly exposed parts from each image (Ie the sky from one and the ground from another) and merges them seamlessly into a pure HDR image. This image has 32 bits of dynamic range (you can google for the maths behind this, but that is an enourmous amount of brightness variation). The problem is that when you look at this image it looks flat, dull boring, nothing like the HDR images you can see in my albums (or you can find actually good examples on other websites ).
).
The problem is that the monitor you are viewing the HDR image on has a mere 8 bits of dynamic range, the same as the sensor in the camera that captured the original exposures. It simply cannot physically display the dynamic range that your eye can percieve
All is not lost however. People far cleverer than I developed a technique called 'Tone Mapping' that essentially squeezes those 32 bits of DR into 8 bits. At the end of this you have your surreal HDR image ready to put on pinkbike for people to steal without giving you any credit. You know who you are.
In my above example, after processing through my HDR software I get this:
![photo]()
If you're not used to HDR it does look rather intense. It certainly doesn't have to be, I know there are people who view HDR as some sort of treachery against photography, and loathe 'overprocessed' or the ever classic 'un-natural' look of photos such as mine, but that's all politics. Just look at my example here and compare to the exposures above. Note that you can see the detail from both the bright ground areas and dark sky areas in one shot. The dynamic range captured is far higher, hence 'High dynamic range' .
**The practical bit**
This is still quite technical, if you're used to a point n shoot camera or cameraphone I doubt you will be able to do this. Simple test: Aperture, EV, Shutter....do you know what they are and how to adjust them on your camera? I'm not being patronising, I just don't want people coming up to me and asking how to change the shutter speed on their iphone. I don't have one so maybe you can
If anyone made it through the above you'll now be wanting to know how you make some HDRs for yourself and friends to share. There are in fact 2 ways of doing this, the proper way and the mild hack way.
Method one: Exposure blending, the 'proper' way.
You need two things: A camera that has manual controls (over shutter speed/aperture, though EV step controls are good enough for basic HDR work). You also need a very good sturdy tripod. The tripod isn't strictly essential but it saves a huge amount of pain further down the line.
I forgot to add this in my original article, but if your camera has a bracketing function, then ignore the below and use that. My D40, being old and low end even when it was released, lacks this extremely useful feature. Bracketing does what is described below automatically with a single button press. It also makes having a tripod less essential as long as you can hold the camera steady.
-Set up your scene with the camera on the tripod. It needs to be something stationary (Ie a bike against a wall) and you should also make sure there is no movement in the frame, such as people walking about at the sides, as this wreaks havok with the software. It's not entirely impossible to fix if there is backround movement but really minimize it if you can. This also includes leaves on trees moving and traffic etc. Even clouds but you can't do much about that.
-Put your camera into manual mode and find the 'normal' exposure. Don't take the shot but instead increase the exposure a bit. 1+EV step should be enough to start with. Take the shot now.
-Reduce the exposure to normal and take another shot.
-Reduce exposure to -1EV and take a shot.
It doesn't actually matter the order in which you take the shots. I just start from overexposed and work down for simplicity.
Hooray. You're done. Now comes the actual work.
I think in many peoples minds photos (especially heavily processed ones, like HDR/Panorama) magically transfer from the camera to the internet with no human intervention. Actually you can do that now with an eyefi SD card, but lets ignore that. Now comes that part that at least for me defines photography as much as pressing the shutter; the software.
The software and settings I use are chosen from experience and for being freeware. There is so much out there for you to use, but be prepared to shell out good money for the professional grade programs. Or if you believe people should not be rewarded for their work, just pirate it, because that makes you a hardcore rebel*.
**The software**
If you've been around me at Saughton skatepark you will hear me mentioning this acronym, pay attention now:
QTPFSGUI.
>QTPFSGUI.Sourceforge.net<
Now renamed Luminance HDR, what was wrong with the old name
That's where the magic happens. It's free, open source and simply excellent, and seeing what can be achieved with it calls into question the need for the professional programs. Download and install, though be aware that being a linux-based program, there can be teething problems getting it to run on Windows. The fixes are easy to come by with googling though, don't be afraid.
I'll walk you through the process.
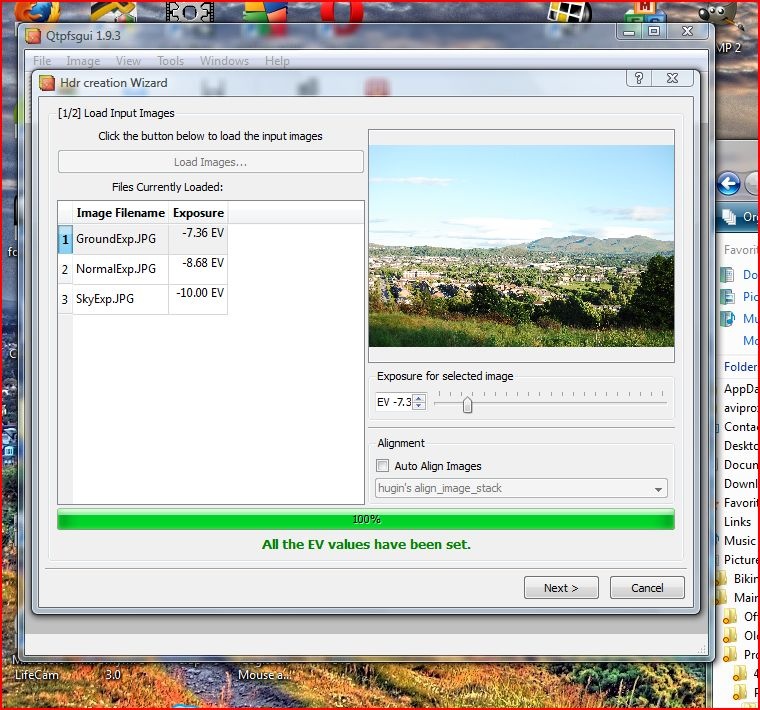
Get your 3 exposures handy in a folder and open the program. Select your 3 shots and drag them onto the window. Then select 'New HDR'. They'll load up and the program will automatically detect which are the over/under exposed ones and adjust itself automatically. Ignore everything else for now and click next. You'll now be taken to the manual alignment screen. Now is when you discover exactly how good your tripod is. If you used one....
![photo]()
![photo]()
![photo]()
The ghostly images are showing how well aligned each shot is with the others. You need to look at a sharp edge, ie from railings, walls, for misalignments. They show up as pure white edges. If you can see them you need to manually adjust the alignment using those arrow buttons. You'll probably not get it perfect, but although this is hard to explain in words, you'll know when it's correct.
I used a good tripod so mine are very well aligned. This is what it looks like:
ALIGNED
![photo]()
For the sake of this example I've used the arrows to deliberately exaggerate a misalignment to show you what it looks like. If your photos weren't aligned in the first place you'll see something like this, though probably not as severe:
NOT ALIGNED
![photo]()
Now hit next, and then finish on the next screen.
Depending on how large your photos are, and how slow your PC is, it can take a while to process this part. My D40 is only 6MP and I have a 3.2ghz dual core processor so it's pretty speedy for me, just a few seconds when using 3 exposures. You are now presented with a pure 32-bit HDR image in the window. I wasn't lying when I said it looks dull.
![photo]()
You're almost there. Hit the 'Tonemap the HDR' button. The controls here are quite complicated. I'll explain what's going on first, then recommend some settings. Anything which I don't explain you should leave alone for now.
-Top left, where it says Operator in bold, that selects the mathematical algorithm used to transform the pure HDR into a 8-bit jpeg. I'm guessing these are named after the people who coded them. Reinhard '02 is the default.
-Moving down, you come to the settings for this operator. You can have lot of fun tweaking these.
-At the bottom left is the 'Results size' option, this is IMPORTANT! and sets the size of the finished image. By default it selects a very scaled down option, the maximum is limited to the size of your original shots.
-Apply is used to start the tonemapping.
It should be self explanatory from here. Pressing apply will spit out your finished image in the main window.
The actual tonemapping is mostly trail and error, that's how I learned the program. I'm tempted to let you struggle with the settings for hours like I did, trying to get good results. But since I'm feeling generous, I'll provide you with my most common settings.
Select the 'Fattal' operator from the menu and set the options to the following:
--------------
FATTAL
ALPHA=0.002
BETA=0.920
SATURATION=1.0
DENOISE=0
--------------
Set your result size large and wait for your finished image to be processed.
![photo]()
I'm not sure what exactly alpha and beta represent, but you can try changing them and see what happens. Saturation is just the intensity of the colours and you may want to reduce this slightly if you find it too intense. Denoise does what it says - it removes the speckled, grainy appearance of bright smooth surfaces (eg the sky) in the shot, but also damages contrast in other areas and can make the image lose much of its bite. 0.2 is a decent enough setting if you want it.
Now do File>Save as LDR to save your image as a jpeg. That's it, you're done.
Gotcha.
I'd be very surprised if you're completely happy with the image you have. The colours can seem quite offputting and maybe just too intense. Use your favourite software to adjust the white balance/saturation/brightness etc until you're happy with it. I'm sure you know how to upload it now.
**Notes**
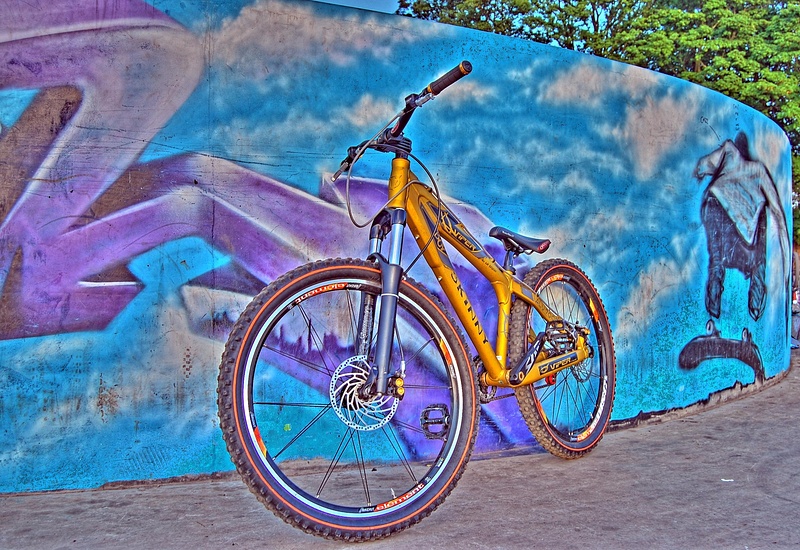
The exact above technique and settings are what I used to make this:
![photo]()
Good image, dontchathink? It turned out very well and I'm pleased with it.
I actually used 5 exposures; 1 highly overexposed, 1 slightly overexposed, 1 normal, 1 slightly underexposed and one very underexposed. You can extend this to any number of shots. 3 is fine for basic work, 5 is what I use most of the time, though if you're feeling up to it you can try 7,9,11,13......
There are limitations on the multiple exposure method. If you had fun realigning the shots or got loads of ghosting artifacts everywhere you know them. Each shot really has to be perfectly the same as the last except for the exposure. This makes it completely impossible to use this method to create a HDR action shots of moving subjects. So how, in my wisdom, did I manage something like this:
![photo]()
This brings me very neatly to the next method.
Method two: The 'mild hack', RAW Tonemapping
I call this a mild hack as it does not quite capture the full dynamic range of a scene and represents a dirty workaround. But it's the end results which matter and this one delivers the goods.
You need:
A camera with RAW mode. That's all, no tripod, no messing about. Just a RAW mode. If you don't know what that is your camera probably doesn't have it. This rules out almost all compact cameras.
If you read the technical section you'll recall that I said that the camera has a 8-bit dynamic range, the same as the jpeg output. That was a lie. The image sensor has ~12-14 bits of DR. The 'extra' dynamic range is removed by the camera electronics before the image is even saved onto the memory card. But since we need this extra, can we tell the camera not to remove it? Yes, by selecting RAW mode. This quite literally tells the camera to save the 'raw' data from the sensor onto the card and perform absoloutely no processing. The result is a file that contains significantly more data than a jpeg of the same resolution. We can then extract the extra DR ourselves.
If you're not familiar with working with RAW files don't worry, this is very straightforward.
-With your camera in RAW mode and normal/auto exposure settings, take your picture.
Done. Seriously, that's it on the shooting side of things.
The software side is thankfully just as simple. You can use the 'Open HDR' option in QTPFSGUI to directly open the RAW file. There may be a problem here in that it crashes, there is a fix, just google for it while specifying your operating system.
If it worked you can then directly tonemap the HDR into your image as above in the first section. Sorted.
**Notes**
This method allows you to capture action shots. No misalignments ever, since it's only one shot. You may have picked up on the main disadvantage of doing this though, namely that while 14-bits of DR is better than 8, it's nowhere near the 32 bits you get with exposure blending. You'll never get quite as good results.
The other problem is noise; look at the bowl/wallride picture above, specifically at his jeans. See that grey fuzz in the dark cloth? That's sensor noise. It is normally removed as part of saving a normal jpeg in the camera which is why you won't see it, at least at low ISO. But we're telling the camera to record all data, even the undesireable parts.
If you're going back to QTPFSGUI to turn up that Denoise setting I mentioned, then I'm pleased because you're paying attention and thinking about this. But you will just have discovered what I also said about that; it removes contrast as well. You can't have it both ways, at least not without advanced editing (ie taking the clean, low noise rider and pasting him onto the high noise but good looking shot processed seperately).
--------------
RANT FOLLOWS BELOW
No2: Why yes I am.
The above is entirely my own work so I'm expecting that you think I have some idea of what I'm talking about here.
Picture (hehe) the scene; I'm at the skatepark with my camera and tripod set up, discussing the settings I should use with myself. I also wander around taking shots and showing them to people and giving them my pinkbike address so they can see them. Or use them, more on this in a minute.
It is an absoloute certainty that someone will come up to me and say:
"Are you a photographer, like?"
Why no actually, I merely have a digital SLR camera, a sturdy tripod, carrying bag with appropriate accessories, and I spend my time taking photographs, then processing them on the computer, then securely archiving them. I then share these photos online in the anticipation of both praise and criticism. Both motivate me to continually hone my technique and improve my skills. I also participate in discussing the photographs of others and the industry in general.
So no, I'm not a photographer, sorry.
RANT CONTINUES
No sorry, it's electric. If you get this you know me well indeed
RANT CONTINUES
I'm not going to name names here, but I've noticed a few people 'borrowing' my photos for their own albums. Murray/Muzzler (come on, we all know who he is) does this frequently. In fact his posting of my photos gets far more attention and comments than my originals.
But he gives credit.
That's all I ask. I know nobody really bothers reading descriptions anyway, but as long as it says 'cheers to allebong', I'm content. Thanks murray, I don't know if you read this far, but I appreciate the effort
I also know that several of these are on facebook. I don't have an account but I probably will soon as I've been nagged about it enough. I'm not going to insist you take them down, but if someone says 'nice pic, did you take that?' can you please be honest? Is that too much to ask?
If you think I'm being stingy trust me I'm not; it's trivial for me to slap a massive watermark right across the center of the photo. But I won't.
You're probably wondering why I'm like this. The roots of my desire for some recognition are deep and complex, but can you understand that if you invest a fairly sizeable amount of money and huge amount of time in photography, that it isn't very nice if people just take your work casually? I don't want a shrine dedicated to the D40, but hopefully you can understand where I'm coming from.
RANT ENDNOTE
I mentioned above that I like people criticising my photos. Please do it. But please note that criticising generally means:
1- Explaining what you think are the problems with the photo. In specific terms, just telling me that my HDR is 'Sloppy' isn't exactly helping.
2- If you can, tell me how to improve it. I'm not going to turn around and scold you for it.
NEXT TIME: Panoramic Photography
*Sarcasm. Health and safety and all that. Don't want to be sued.
Updated 5th July 2010
Added loads of pictures.
----------------------------------------------------------------------------------------------This will be first in a series of explanatory articles written by me about my photographic techniques. Today it's what I seem to be best known for, my HDR photos. Next time: Panoramas. Then HDR Panoramas. Then timelapses. Then HDR Timelapses.
No1: High dynamic range photography.
If you want to know how to actually do it, skip this part.
**The technical bit**
HDR is used to overcome the fact that a cameras dynamic range (the contrast between the brightest and darkest areas of a scene) is very low compared to the eye. If you look at a landscape you can see a deep blue sky plus white clouds and bright green trees. If you pick up camera and try to capture the scene, one of 3 things will happen:
-The camera will adjust the exposure to the sky, resulting in a fast shutter, and leaving you with the deep blue sky and clouds looking great, but the landscape totally black.
-The camera may expose the ground correctly, using a slower shutter, but this results in the sky being completely white and 'blown out'.
-Most likely, the camera will compromise between these extremes and leave you with a somewhat passable image. Passable until you see the 2 alternatives.
Here's an example, it's from a recent hike up Corstorphine hill:

Here, the exposure is set for the land. The greens are bright and clear, if slightly washed out due to bloom. But look at the sky, it's blown out, far too light and the clouds are pure white.
We now want to get the detail in the clouds and sky. So we underexpose the image:

As far as the sky goes, this is much better. It's a lovely deep blue and you can see all the detail in the clouds. But now the landscape is too dark. It seems we can't win.
The compromise, or normal exposure, is what you'll get if you have your camera on auto mode and use full evaluative metering. This represents the average between the two above extremes:

Now you may think, and I agree, that the normal exposure looks better than either the over or underexposed ones. Compare them more closely though. In the normal one there isn't as much detail in the bright areas as the overexposed one, nor is there as much detail in the dark areas as the underxposed one.
There are two methods to bring out detail in both the bright and dark areas:
The first is to use a gradient neutral density filter, which I won't explain here, but it isn't hard to understand. This technique creates a very natural, smooth image (at least compared to the surrealness of HDR). This does require specific additional equipment which I may soon invest in as I am very fond of landscapes. Enough about this anyway.
The second way is to employ HDR. It's very simple in theory (and oh so head-poundingly complicated in practice, trust me). Remember the landscape example? You can either expose the sky OR the land correctly, but not both in one image. So why not simply take the sky from the deep-blue sky image and the land from the bright-land image and stick them together? It's the same scene so it'll line up perfectly. This is, in essence, what HDR does. If you're feeling crafty you can try my example easily enough. Just take your 2 exposures (one with the sky correctly exposed, the other with the land) and use your local image editing software to manually cut and paste the sky onto the land. It looks odd because you're not getting the dark area detail into the land, but it shows the concept.
The actual way it's done in the specialist HDR software is somewhat different but leads to the same results. It's normal to use 3 exposures to accomodate the midtones of the scene; that is, one shot overexposed, one 'normal' (ie compromised) exposure and one underexposed. The software takes the correctly exposed parts from each image (Ie the sky from one and the ground from another) and merges them seamlessly into a pure HDR image. This image has 32 bits of dynamic range (you can google for the maths behind this, but that is an enourmous amount of brightness variation). The problem is that when you look at this image it looks flat, dull boring, nothing like the HDR images you can see in my albums (or you can find actually good examples on other websites
The problem is that the monitor you are viewing the HDR image on has a mere 8 bits of dynamic range, the same as the sensor in the camera that captured the original exposures. It simply cannot physically display the dynamic range that your eye can percieve
All is not lost however. People far cleverer than I developed a technique called 'Tone Mapping' that essentially squeezes those 32 bits of DR into 8 bits. At the end of this you have your surreal HDR image ready to put on pinkbike for people to steal without giving you any credit. You know who you are.
In my above example, after processing through my HDR software I get this:

If you're not used to HDR it does look rather intense. It certainly doesn't have to be, I know there are people who view HDR as some sort of treachery against photography, and loathe 'overprocessed' or the ever classic 'un-natural' look of photos such as mine, but that's all politics. Just look at my example here and compare to the exposures above. Note that you can see the detail from both the bright ground areas and dark sky areas in one shot. The dynamic range captured is far higher, hence 'High dynamic range' .
**The practical bit**
This is still quite technical, if you're used to a point n shoot camera or cameraphone I doubt you will be able to do this. Simple test: Aperture, EV, Shutter....do you know what they are and how to adjust them on your camera? I'm not being patronising, I just don't want people coming up to me and asking how to change the shutter speed on their iphone. I don't have one so maybe you can
If anyone made it through the above you'll now be wanting to know how you make some HDRs for yourself and friends to share. There are in fact 2 ways of doing this, the proper way and the mild hack way.
Method one: Exposure blending, the 'proper' way.
You need two things: A camera that has manual controls (over shutter speed/aperture, though EV step controls are good enough for basic HDR work). You also need a very good sturdy tripod. The tripod isn't strictly essential but it saves a huge amount of pain further down the line.
I forgot to add this in my original article, but if your camera has a bracketing function, then ignore the below and use that. My D40, being old and low end even when it was released, lacks this extremely useful feature. Bracketing does what is described below automatically with a single button press. It also makes having a tripod less essential as long as you can hold the camera steady.
-Set up your scene with the camera on the tripod. It needs to be something stationary (Ie a bike against a wall) and you should also make sure there is no movement in the frame, such as people walking about at the sides, as this wreaks havok with the software. It's not entirely impossible to fix if there is backround movement but really minimize it if you can. This also includes leaves on trees moving and traffic etc. Even clouds but you can't do much about that.
-Put your camera into manual mode and find the 'normal' exposure. Don't take the shot but instead increase the exposure a bit. 1+EV step should be enough to start with. Take the shot now.
-Reduce the exposure to normal and take another shot.
-Reduce exposure to -1EV and take a shot.
It doesn't actually matter the order in which you take the shots. I just start from overexposed and work down for simplicity.
Hooray. You're done. Now comes the actual work.
I think in many peoples minds photos (especially heavily processed ones, like HDR/Panorama) magically transfer from the camera to the internet with no human intervention. Actually you can do that now with an eyefi SD card, but lets ignore that. Now comes that part that at least for me defines photography as much as pressing the shutter; the software.
The software and settings I use are chosen from experience and for being freeware. There is so much out there for you to use, but be prepared to shell out good money for the professional grade programs. Or if you believe people should not be rewarded for their work, just pirate it, because that makes you a hardcore rebel*.
**The software**
If you've been around me at Saughton skatepark you will hear me mentioning this acronym, pay attention now:
QTPFSGUI.
>QTPFSGUI.Sourceforge.net<
Now renamed Luminance HDR, what was wrong with the old name
That's where the magic happens. It's free, open source and simply excellent, and seeing what can be achieved with it calls into question the need for the professional programs. Download and install, though be aware that being a linux-based program, there can be teething problems getting it to run on Windows. The fixes are easy to come by with googling though, don't be afraid.
I'll walk you through the process.
Get your 3 exposures handy in a folder and open the program. Select your 3 shots and drag them onto the window. Then select 'New HDR'. They'll load up and the program will automatically detect which are the over/under exposed ones and adjust itself automatically. Ignore everything else for now and click next. You'll now be taken to the manual alignment screen. Now is when you discover exactly how good your tripod is. If you used one....


The ghostly images are showing how well aligned each shot is with the others. You need to look at a sharp edge, ie from railings, walls, for misalignments. They show up as pure white edges. If you can see them you need to manually adjust the alignment using those arrow buttons. You'll probably not get it perfect, but although this is hard to explain in words, you'll know when it's correct.
I used a good tripod so mine are very well aligned. This is what it looks like:
ALIGNED

For the sake of this example I've used the arrows to deliberately exaggerate a misalignment to show you what it looks like. If your photos weren't aligned in the first place you'll see something like this, though probably not as severe:
NOT ALIGNED

Now hit next, and then finish on the next screen.
Depending on how large your photos are, and how slow your PC is, it can take a while to process this part. My D40 is only 6MP and I have a 3.2ghz dual core processor so it's pretty speedy for me, just a few seconds when using 3 exposures. You are now presented with a pure 32-bit HDR image in the window. I wasn't lying when I said it looks dull.

You're almost there. Hit the 'Tonemap the HDR' button. The controls here are quite complicated. I'll explain what's going on first, then recommend some settings. Anything which I don't explain you should leave alone for now.
-Top left, where it says Operator in bold, that selects the mathematical algorithm used to transform the pure HDR into a 8-bit jpeg. I'm guessing these are named after the people who coded them. Reinhard '02 is the default.
-Moving down, you come to the settings for this operator. You can have lot of fun tweaking these.
-At the bottom left is the 'Results size' option, this is IMPORTANT! and sets the size of the finished image. By default it selects a very scaled down option, the maximum is limited to the size of your original shots.
-Apply is used to start the tonemapping.
It should be self explanatory from here. Pressing apply will spit out your finished image in the main window.
The actual tonemapping is mostly trail and error, that's how I learned the program. I'm tempted to let you struggle with the settings for hours like I did, trying to get good results. But since I'm feeling generous, I'll provide you with my most common settings.
Select the 'Fattal' operator from the menu and set the options to the following:
--------------
FATTAL
ALPHA=0.002
BETA=0.920
SATURATION=1.0
DENOISE=0
--------------
Set your result size large and wait for your finished image to be processed.

I'm not sure what exactly alpha and beta represent, but you can try changing them and see what happens. Saturation is just the intensity of the colours and you may want to reduce this slightly if you find it too intense. Denoise does what it says - it removes the speckled, grainy appearance of bright smooth surfaces (eg the sky) in the shot, but also damages contrast in other areas and can make the image lose much of its bite. 0.2 is a decent enough setting if you want it.
Now do File>Save as LDR to save your image as a jpeg. That's it, you're done.
Gotcha.
I'd be very surprised if you're completely happy with the image you have. The colours can seem quite offputting and maybe just too intense. Use your favourite software to adjust the white balance/saturation/brightness etc until you're happy with it. I'm sure you know how to upload it now.
**Notes**
The exact above technique and settings are what I used to make this:
Good image, dontchathink? It turned out very well and I'm pleased with it.
I actually used 5 exposures; 1 highly overexposed, 1 slightly overexposed, 1 normal, 1 slightly underexposed and one very underexposed. You can extend this to any number of shots. 3 is fine for basic work, 5 is what I use most of the time, though if you're feeling up to it you can try 7,9,11,13......
There are limitations on the multiple exposure method. If you had fun realigning the shots or got loads of ghosting artifacts everywhere you know them. Each shot really has to be perfectly the same as the last except for the exposure. This makes it completely impossible to use this method to create a HDR action shots of moving subjects. So how, in my wisdom, did I manage something like this:

This brings me very neatly to the next method.
Method two: The 'mild hack', RAW Tonemapping
I call this a mild hack as it does not quite capture the full dynamic range of a scene and represents a dirty workaround. But it's the end results which matter and this one delivers the goods.
You need:
A camera with RAW mode. That's all, no tripod, no messing about. Just a RAW mode. If you don't know what that is your camera probably doesn't have it. This rules out almost all compact cameras.
If you read the technical section you'll recall that I said that the camera has a 8-bit dynamic range, the same as the jpeg output. That was a lie. The image sensor has ~12-14 bits of DR. The 'extra' dynamic range is removed by the camera electronics before the image is even saved onto the memory card. But since we need this extra, can we tell the camera not to remove it? Yes, by selecting RAW mode. This quite literally tells the camera to save the 'raw' data from the sensor onto the card and perform absoloutely no processing. The result is a file that contains significantly more data than a jpeg of the same resolution. We can then extract the extra DR ourselves.
If you're not familiar with working with RAW files don't worry, this is very straightforward.
-With your camera in RAW mode and normal/auto exposure settings, take your picture.
Done. Seriously, that's it on the shooting side of things.
The software side is thankfully just as simple. You can use the 'Open HDR' option in QTPFSGUI to directly open the RAW file. There may be a problem here in that it crashes, there is a fix, just google for it while specifying your operating system.
If it worked you can then directly tonemap the HDR into your image as above in the first section. Sorted.
**Notes**
This method allows you to capture action shots. No misalignments ever, since it's only one shot. You may have picked up on the main disadvantage of doing this though, namely that while 14-bits of DR is better than 8, it's nowhere near the 32 bits you get with exposure blending. You'll never get quite as good results.
The other problem is noise; look at the bowl/wallride picture above, specifically at his jeans. See that grey fuzz in the dark cloth? That's sensor noise. It is normally removed as part of saving a normal jpeg in the camera which is why you won't see it, at least at low ISO. But we're telling the camera to record all data, even the undesireable parts.
If you're going back to QTPFSGUI to turn up that Denoise setting I mentioned, then I'm pleased because you're paying attention and thinking about this. But you will just have discovered what I also said about that; it removes contrast as well. You can't have it both ways, at least not without advanced editing (ie taking the clean, low noise rider and pasting him onto the high noise but good looking shot processed seperately).
--------------
RANT FOLLOWS BELOW
No2: Why yes I am.
The above is entirely my own work so I'm expecting that you think I have some idea of what I'm talking about here.
Picture (hehe) the scene; I'm at the skatepark with my camera and tripod set up, discussing the settings I should use with myself. I also wander around taking shots and showing them to people and giving them my pinkbike address so they can see them. Or use them, more on this in a minute.
It is an absoloute certainty that someone will come up to me and say:
"Are you a photographer, like?"
Why no actually, I merely have a digital SLR camera, a sturdy tripod, carrying bag with appropriate accessories, and I spend my time taking photographs, then processing them on the computer, then securely archiving them. I then share these photos online in the anticipation of both praise and criticism. Both motivate me to continually hone my technique and improve my skills. I also participate in discussing the photographs of others and the industry in general.
So no, I'm not a photographer, sorry.
RANT CONTINUES
No sorry, it's electric. If you get this you know me well indeed
RANT CONTINUES
I'm not going to name names here, but I've noticed a few people 'borrowing' my photos for their own albums. Murray/Muzzler (come on, we all know who he is) does this frequently. In fact his posting of my photos gets far more attention and comments than my originals.
But he gives credit.
That's all I ask. I know nobody really bothers reading descriptions anyway, but as long as it says 'cheers to allebong', I'm content. Thanks murray, I don't know if you read this far, but I appreciate the effort
I also know that several of these are on facebook. I don't have an account but I probably will soon as I've been nagged about it enough. I'm not going to insist you take them down, but if someone says 'nice pic, did you take that?' can you please be honest? Is that too much to ask?
If you think I'm being stingy trust me I'm not; it's trivial for me to slap a massive watermark right across the center of the photo. But I won't.
You're probably wondering why I'm like this. The roots of my desire for some recognition are deep and complex, but can you understand that if you invest a fairly sizeable amount of money and huge amount of time in photography, that it isn't very nice if people just take your work casually? I don't want a shrine dedicated to the D40, but hopefully you can understand where I'm coming from.
RANT ENDNOTE
I mentioned above that I like people criticising my photos. Please do it. But please note that criticising generally means:
1- Explaining what you think are the problems with the photo. In specific terms, just telling me that my HDR is 'Sloppy' isn't exactly helping.
2- If you can, tell me how to improve it. I'm not going to turn around and scold you for it.
NEXT TIME: Panoramic Photography
*Sarcasm. Health and safety and all that. Don't want to be sued.
Author Info:
 Member since Sep 17, 2006
Must Read This Week
Sign Up for the Pinkbike Newsletter - All the Biggest, Most Interesting Stories in your Inbox
PB Newsletter Signup
I totally get what you say about people using your photos and not giving credit where it's due. Photography is an art form!
I also would have taken screenshots of the programs to show exactly what's going on. Still, it's mostly self explanatory and common sense. I might add a little corrections section at the start of my next article.
It's only a D40 I use, I know people with £2000-3000 cameras and they don't have a clue how to set them up, their photo's are no better than what I get with my D40. So it just shows you have a talent to get great results with the most basic of tools.